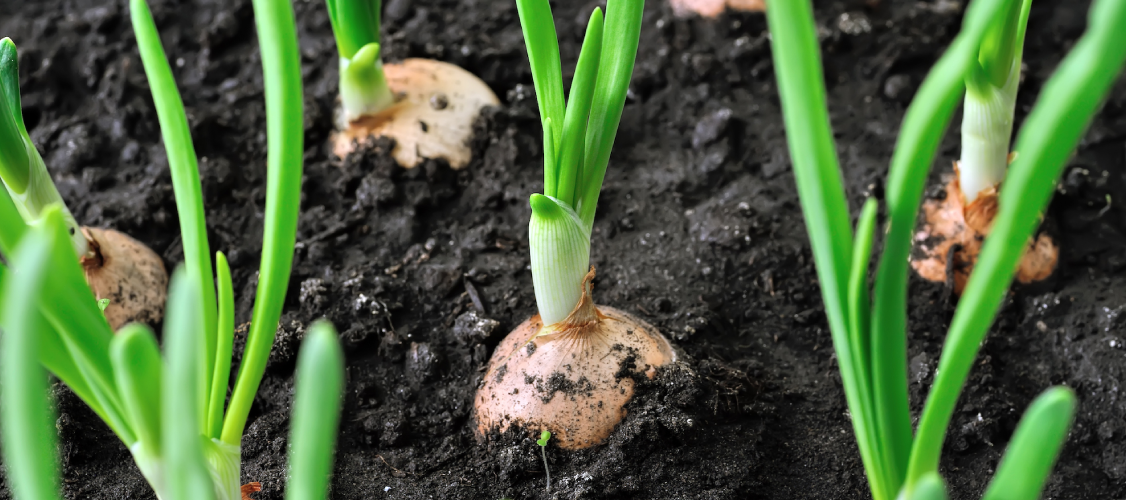
Onions are a staple ingredient in many cuisines around the world, and they are also relatively easy to grow. Here’s a comprehensive guide on how to grow onions from planting to harvesting, including tips on pesticides to spray to ensure a healthy and productive crop. Choose the Right Onion Varieties Onions come in many different varieties, so it’s essential to choose the right ones for your climate and growing conditions. Prepare the Soil Onions prefer loose, well-drained soil with plenty of organic matter. Before planting, work in compost or well-rotted manure to improve the soil’s structure and fertility. Make sure to remove any rocks or debris that could interfere with bulb development. Planting Onions can be grown from seeds, sets, or transplants. If planting from seeds, start them indoors 8 to 10 weeks before the last frost date. Sow the seeds in flats or individual containers, then transplant them outside when they’re 4 to 6 inches tall. If planting sets or transplants, plant them directly into the garden as soon as the soil can be worked in the spring. Onions should be planted about 1 inch deep and 4 to 6 inches apart in rows that are 12 to 18 inches apart. Watering Onions need consistent moisture to develop properly, so water them regularly, especially during dry spells. Water deeply, so the soil is moistened to a depth of 6 inches. Fertilizing Onions are heavy feeders and need plenty of nitrogen to produce large bulbs. Fertilize them every three weeks with a nitrogen-rich fertilizer. Pests and Diseases Onions are susceptible to a few pests and diseases, including thrips, onion maggots, and downy mildew. To control thrips and onion maggots. To prevent downy mildew, make sure the plants have good air circulation and avoid overhead watering. Please contact us on +254 720 325 144 or email us on info@agrichemafrica.com to get a completely free Onion spray program to guide you through all the stages of pesticide spraying. Harvesting Onions are ready to harvest when the tops begin to yellow and fall over. Pull the plants out of the ground and let them dry in the sun for a few days. Once the tops and roots are completely dry, trim them off and store the bulbs in a cool, dry place. In conclusion, growing onions is a rewarding experience that can yield a bountiful harvest with the right care and attention. By choosing the right varieties, preparing the soil, watering, fertilizing, and controlling pests and diseases, you can grow healthy and delicious onions in your garden.
The Complete Guide to Growing Pawpaw: From Planting to Harvesting with Tips on Pesticide Use
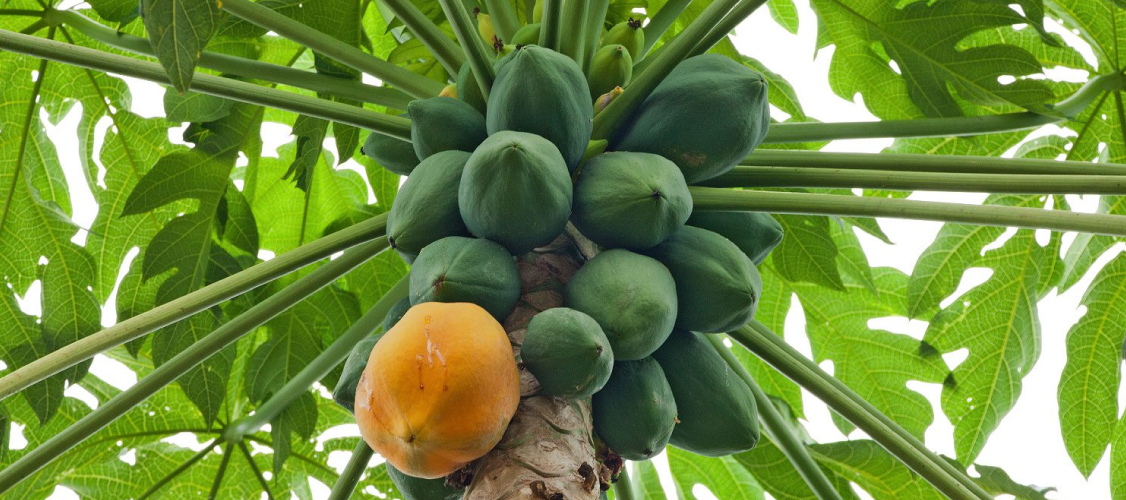
Pawpaw, also known as papaya, is a tropical fruit that can be grown in a home garden. Whether you’re a beginner or an experienced gardener, this guide will help you grow healthy pawpaw from planting to harvesting with tips on pesticide use. Choose the right variety The first step in growing pawpaw is to choose the right variety. There are various types of pawpaw, such as the Red Lady, Honey Gold, and Tainung. Consider your region’s climate and choose a variety that is suitable for your area. Prepare the soil Pawpaw grows best in well-draining soil with a pH level of 6.0 to 6.5. Amend the soil with organic matter such as compost or well-rotted manure. Loosen the soil to a depth of 12 to 18 inches and create mounds that are 6 to 8 feet apart. Plant the seeds Plant pawpaw seeds directly into the mounds when the soil temperature is at least 60°F. Space the seeds 3 to 5 inches apart and plant them 1 to 2 inches deep. Cover the seeds with soil and water well. Water and fertilize regularly Pawpaw needs regular watering, especially during dry spells. Water deeply once a week, rather than frequent shallow watering. Fertilize with a balanced fertilizer every 4-6 weeks. Pesticides to Spray Pawpaw is susceptible to pests like fruit flies, spider mites, and mealybugs. To prevent and control infestations, it’s essential to use effective pesticides. Please contact us on +254 720 325 144 or email us on info@agrichemafrica.com to get a completely free Pawpaw spray program to guide you through all the stages of pesticide spraying. Maintain the plants As the pawpaw plants grow, they will need support. You can use stakes or cages to keep the plants upright. Remove any weeds that compete with the pawpaw for water and nutrients. Harvest the pawpaw Harvest the pawpaw when the fruit is fully ripe and has a yellow-orange color. Cut the fruit from the tree with a sharp knife and remove any remaining stem. Pawpaw is perishable, so store it in the refrigerator or freezer if you don’t plan to consume it immediately. Growing pawpaw can be a rewarding experience. By following these simple steps and incorporating effective pesticide use, you can enjoy healthy pawpaw from your garden all season long while protecting your crop from pests and diseases.

A Step-by-Step Guide to Growing Cabbage: From Planting to Harvesting with Effective PesticidesB
Cabbage is a nutrient-dense vegetable that can be easily grown in a home garden. Whether you’re a novice or an experienced gardener, this guide will help you grow healthy cabbage from planting to harvesting with tips on using effective pesticides. Choose the right variety The first step in growing cabbage is to choose the right variety. There are many types of cabbage, such as green, red, and savoy. Consider your preference and choose a variety that is suitable for your region and growing season. Prepare the soil Cabbage grows best in well-draining soil with a pH level of 6.0 to 7.5. Amend the soil with compost or well-rotted manure. Loosen the soil to a depth of 8 to 10 inches and add a balanced fertilizer before planting. Plant the seeds Plant cabbage seeds directly into the garden when the soil temperature is at least 45°F. Space the seeds ½ inch deep and 2 to 3 inches apart. Cover the seeds with soil and water well. Water and fertilize regularly Cabbage needs regular watering, especially during dry spells. Water deeply once a week, rather than frequent shallow watering. Mulch around the plants to retain moisture. Fertilize with a balanced fertilizer every 3-4 weeks. Pesticides to Spray Cabbage is susceptible to pests like cabbage worms, aphids, and flea beetles. To prevent and control infestations, it’s essential to use effective pesticides. Please contact us on +254 720 325 144 or email us on info@agrichemafrica.com to get a completely free Cabbage spray program to guide you through all the stages of pesticide spraying. Maintain the plants As the cabbage plants grow, they will need support. You can use stakes or cages to keep the plants upright. Remove any weeds that compete with the cabbage for water and nutrients. Harvest the cabbage Harvest the cabbage when the heads are firm and fully formed. Cut the heads from the base with a sharp knife and remove any outer leaves that are damaged or discolored. Growing cabbage can be a rewarding experience. By following these simple steps and incorporating effective pesticide use, you can enjoy healthy cabbage from your garden all season long while protecting your crop from pests and diseases.
The Comprehensive Guide to Growing Maize: From Planting to Harvesting with Effective Pesticides”
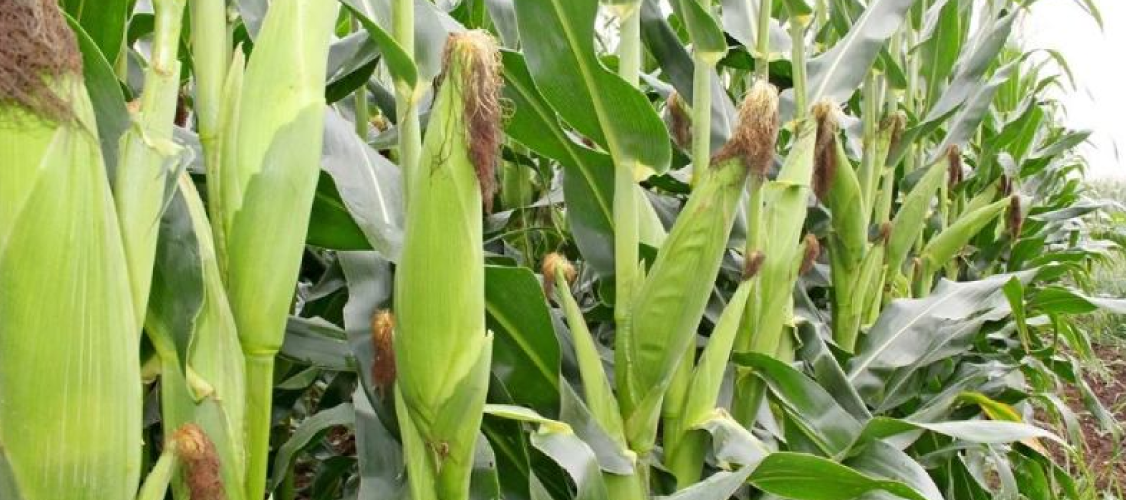
Maize, also known as corn, is a staple crop that is easy to grow in home gardens. Whether you are a beginner or an experienced gardener, this guide will help you grow healthy maize from planting to harvest while also addressing the use of effective pesticides to protect your crop. Choose the right variety The first step in growing maize is to choose the right variety. There are many types of maize, such as sweet corn, popcorn, and flour corn. Consider the purpose of your maize, whether it’s for eating fresh, popping, or making flour. Prepare the soil Maize prefers well-drained soil that is rich in organic matter. Amend the soil with compost or well-rotted manure. The pH should be around 6.0-6.8. Test the soil if you are unsure. Plant the seeds Plant the maize seeds directly in the garden once the soil has warmed up to at least 60°F. Maize needs full sun, so choose a spot that receives at least 6 hours of sunlight a day. Space the seeds 8-12 inches apart in rows that are at least 30 inches apart. Water and fertilize regularly Maize needs regular watering, especially during dry spells. Water deeply once a week, rather than frequent shallow watering. Mulch around the plants to retain moisture. Fertilize with a balanced fertilizer every 3-4 weeks. Pesticides to Spray Maize is susceptible to pests like armyworms, cutworms, and corn earworms. To prevent and control infestations, it’s essential to use effective pesticides. Please contact us on +254 720 325 144 or email us on info@agrichemafrica.com to get a completely free Maize spray program to guide you through all the stages of pesticide spraying. Maintain the plants As the maize plants grow, they will need support. You can use stakes or cages to keep the plants upright. Remove any weeds that compete with the maize for water and nutrients. Harvest the maize Harvest the maize when the ears are firm and the kernels are fully formed. You can check for ripeness by squeezing a kernel. If it releases a milky liquid, it’s ready to harvest. Twist the ear off the stalk and remove the husks. Growing maize can be a satisfying experience. By following these simple steps and incorporating effective pesticide use, you can enjoy healthy maize from your garden all summer long while protecting your crop from pests and diseases.
The Ultimate Guide to Growing Juicy Tomatoes: From Planting to Harvest
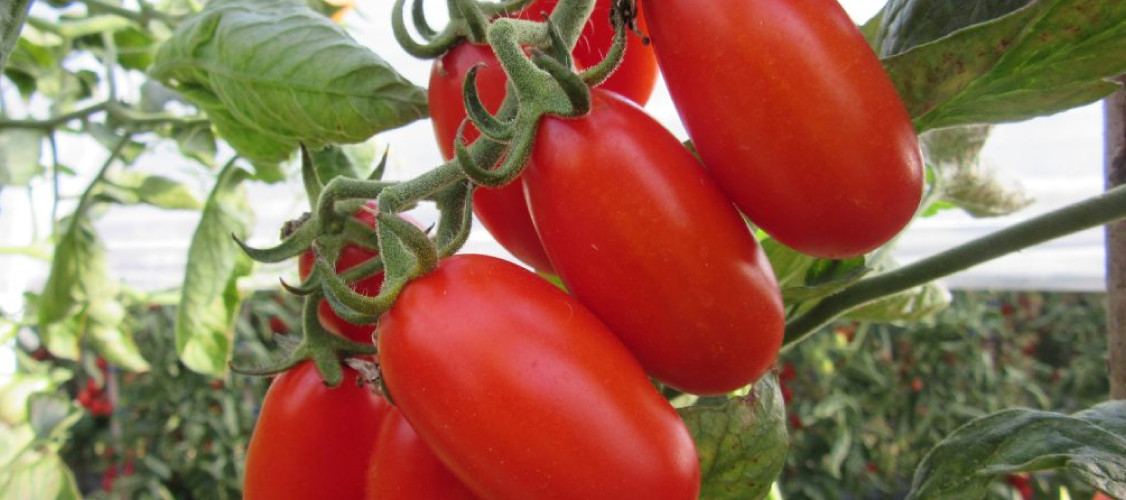
Tomatoes are one of the most popular vegetables grown in home gardens. They are easy to grow, delicious, and nutritious. Whether you are a beginner or an experienced gardener, this guide will help you grow juicy tomatoes from planting to harvest, while also addressing the use of effective pesticides to protect your crop. Choose the right variety The first step in growing tomatoes is to choose the right variety. There are many types of tomatoes, such as cherry, beefsteak, and roma. Consider the size, flavor, and texture of the tomatoes you prefer. Some varieties are better for cooking, while others are better for eating fresh. Start with healthy seedlings If you are starting from seed, sow them indoors 6-8 weeks before the last frost date. Once they have grown to about 6 inches tall, transplant them to larger pots. If you are buying seedlings, look for ones that are dark green and sturdy. Prepare the soil Tomatoes prefer well-draining soil that is rich in organic matter. Amend the soil with compost or well-rotted manure. The pH should be around 6.0-6.8. Test the soil if you are unsure. Plant the seedlings Plant the seedlings in the garden when the soil has warmed up to at least 60°F. Tomatoes need full sun, so choose a spot that receives at least 6 hours of sunlight a day. Space the plants 2-3 feet apart, and bury them deeper than they were in their pots. This will encourage a strong root system. Water and fertilize regularly Tomatoes need regular watering, especially during dry spells. Water deeply once a week, rather than frequent shallow watering. Mulch around the plants to retain moisture. Fertilize with a balanced fertilizer every 3-4 weeks. Prune and support the plants Tomatoes need support as they grow. You can stake them or use a trellis. As they grow, prune off the suckers (the shoots that grow between the stem and a branch) to encourage larger fruits and better airflow. Pesticides to Spray Tomatoes are prone to diseases and pests like aphids, tomato hornworms, and whiteflies. To prevent and control infestations, it’s essential to use effective pesticides. Please contact us on +254 720 325 144 or email us on info@agrichemafrica.com to get a completely free Tomato spray program to guide you through all the stages of pesticide spraying. Harvest the tomatoes Harvest the tomatoes when they are fully ripe. They should be firm and brightly colored. You can store them at room temperature for a few days or in the refrigerator for up to a week. Growing tomatoes can be a fun and rewarding experience. By following these simple steps and incorporating effective pesticide use, you can enjoy juicy tomatoes from your garden all summer long while protecting your crop from pests and diseases.
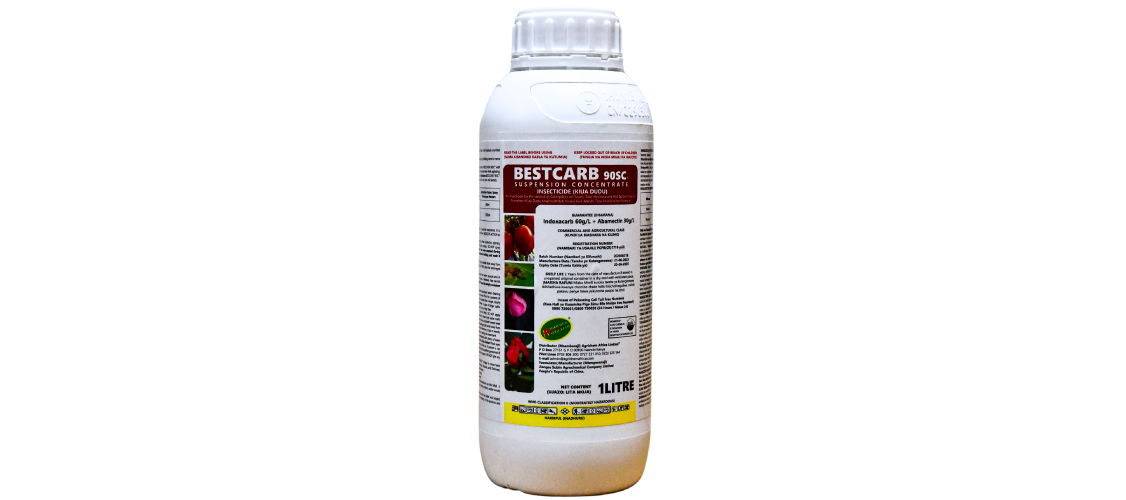
Bestcarb 90SC
Indoxacarb 60g/L + Abamectin 30g/L Insecticide for the control of Caterpillars in Roses; Tuta Absoluta in Tomatoes. Directions for Use: CROP PEST APPLICATION RATE RE-ENTRY INTERVAL Roses Tomatoes Caterpillars Tuta Absoluta 10ml in 20 Litres of water; 500ml in 1,000 Litres of water 6 Hours Pre-Harvest Interval on Tomatoes: 7 Days Available Packages: 1Litre; 250ml; 100ml; 50ml

STARCOP
GUARANTEE (DHAMANA) Copper Sulphate 50g/L + Chelated Amino Acids DESCRIPTION STARCOP® is a broad spectrum Copper solution fortified with Amino Acids. STARCOP® is used for correcting Copper deficiency, boosting plant synthesis and ideal for stress management in Wheat, Barley, Coffee, Onions, Tomatoes, Potatoes, Vegetables, Beans, Peas, Carnations and Roses. DIRECTIONS FOR USE STARCOP® should be applied during Vegetative growth of a plant. CROPS APPLICATION RATES Wheat and Barley 1Litre per Hectare and 50ml per 20Litres of water Coffee 1Litre per Hectare and 40ml per 20Litres of water Onions 600ml per Hectare and 20ml per 20Litres of water Tomatoes Potatoes and Vegetables 350ml per Hectare and 10ml per 20Litres of water Beans and French Beans 700ml per Hectare and 25ml per 20Litres of water Ornamentals (Carnations and Roses) 700ml per Hectare and 25ml per 20Litres of water COMPATIBILITY STARCOP® is compatible with most pesticides. However, it is recommended to do a miscibility test before mixing with other chemicals. Avoid mixing STARCOP® with highly alkaline or acidifying materials. Also avoid mixing STARCOP® with any products containing Phosphate fertilizers.

ALLWIN GOLD SUPER
IMPROVES ENZYME ACTIVITY AND FRUIT SETTING COMPOSITION (%w/w) APPLICATIONS APPLICATION RATES AMINO ACID + SEA WEED + POTASSIUM BASED NUTRIENTS 22.40 ADJUVANTS & STABILIZER 9.90 OTHER INGREDIENTS 67.70 TOTAL 100 ALLWIN GOLD SUPER® is recommended for Maize; Mangoes; Potatoes; Roses; Tomatoes. RECOMMENDED USAGE ALLWIN GOLD SUPER® is recommended to be used 2 – 3 times during the crop season. CROPS APPLICATION RATE AND STAGE OF CROP Maize; Mangoes; Potatoes; Roses; Tomatoes 20 DAYS OF PLANTING 750ml in 300Litres of water per Hectare; 50ml in 20Litres of water FLOWERING STAGE 750ml in 500Litres of water per Hectare; 30ml in 20Litres of water FRUIT SETTING 750ml in 500Litres of water per Hectare; 30ml in 20Litres of water

ATONIK
DESCRIPTION ATONIK® is a biostimulant showing some S.A.R. (Systemic Activated Resistance) activities. It improves the growth and yields of the treated crop, and though it has no fungicide effect as such, it stimulates the disease defence mechanism of the plant. It can be used on Ornamentals and French Beans, alongside with conventional fungicides when necessary (application on threshold). If ATONIK® is intended to be applied alone, it is recommended to apply together with a non-iconic surfactant. DIRECTIONS FOR USE (Recommended Application Rates of Products) APPLICATIONS TARGETS RATE/HA Roses Powdery Mildew, Botrytis and Downy Mildew 1L French Beans Rust, Anthracnosis and Angular Leaf Spot 1L APPLICATION TIMING AND TECHNIQUE ATONIK® should be applied on a regular basis every 14 Days. Apply ATONIK® just after transplanting on the seedllings before the diseases appear. Use a spray volume of 500-1,000L per Ha. Preparation of the Injection or Spray Mixture: Half fill the spray tank (Knapsack) with water. Add the required amount of ATONIK® then add more water to the required and mix or agitate thoroughly to uniformity. Ensure that the mixture is used the same day. COMPATIBILITY AND DISEASE RESISTANCE MANAGEMENT ATONIK® is compatible with common fungicides and insecticides. ATONIK® is not active directly on the disease. It has got no resistance issues. RE-ENTRY PERIOD It is safe to enter sprayed area after 12 Hours have elapsed. Pre-Harvest Interval: Ornamentals: No pre-harvest interval / Vegetables: One (1) Day ATONIK® is exempteded the requirement for a tolerance for residues.

AGROZYME
DESCRIPTION AGROZYME® is an eco-friendly organic Bio-stimulant of vegetable origin obtained from Seaweed processed in advanced and controlled reaction to give maximum output. In addition, AGROZYME® is blended with plant stimulators and organic nutrients to give tremendous boost and increase in tolerance of plant to drought conditions, application in large variety of field, tropical and horticultural crops. AGROZYME® easily degradable, eco-friendly and leaves no residue, and certified as input under organic production. AGROZYME® contains well balanced essential nutrients for boosting plant growth formulated for rapid and effective absorption through the leaves thus easily available to plant providing extensive branching with lush green foliage, helps in availing of other nutrients by increase in chlorophyll, chloroplast, flowering, inhibiting dropping and enhancement of quality produce and yield. CHEMICAL COMPOSITION Black Coloured Viscous Liquid; 35% Extract from Ascophyllum Nodosum Proteins Carboxyl and Hydroxyl Group Biostimulant Carbohydrates; 15% Nutrient and PGR Stabilizers and Preservatives; 50% Aqueous Solvents 100% TOTAL; Sp Gravity 1.06 ± 0.05; Kelp 9 ± 1; Organic Matter 5 ± 1; Phosporous (asP2O5) 0.2 ± 0.1; Potassium (as K2O) 1 ± 0.5; Nitrogen (N) 0.3 ± 0.1; Magnesium 1000ppm ± 10ppm; Iron (Fe) 1,000ppm ± 10ppm; Manganese (Mn) 1,000ppm ± 10ppm; Zinc (Zn) 1,000ppm ± 10ppm; Copper (Cu) 1,000ppm ± 10ppm; Boron (B) 100ppm ± 10ppm CROPS APPLICATION RATE ALL CROPS: Horticultural Field, Vegetables and Spice Crops e.g. Maize Wheats Barley Mango Banana Coconut Betelnut Rice Paddy Pigeon Peas French Beans Soya Beans All Vegetables Fruits and Spices Foliar Application: 30ml in 20 Litres of water; 1.5 Litres in 1,000 Litres of water Soil Drench / Application: 3Litres in 1,000 Litres of water CAUTION Avoid direct exposure of the product to sunlight. Always shake contents before using the product. Container needs to be tightly capped. Wear gumboots, rubber gloves, overall and face shield when mixing or spraying. DO NOT drink, eat or smoke when mixing or spraying. Remove and wash contaminated protective clothing after work. Clean contaminated body parts with plenty of clean water and soap. Avoid spray drift.